
Structure and Light
PRODUCT DESIGN | PRODUCT RESEARCH
This lamp, that is made out of task board and tissue paper, shows 5 different sides which include maps of places my family values. My initial design was created in Illustrator and then traced into Rhino 3D which allowed me to create a file to send to the laser cutter. Once my task board pieces were cut, I added the tissue paper and glued together the sides.
Project Statement:
Design and build a 6in by 6in by 6in lamp out of task board using the laser cutter.
RESEARCH
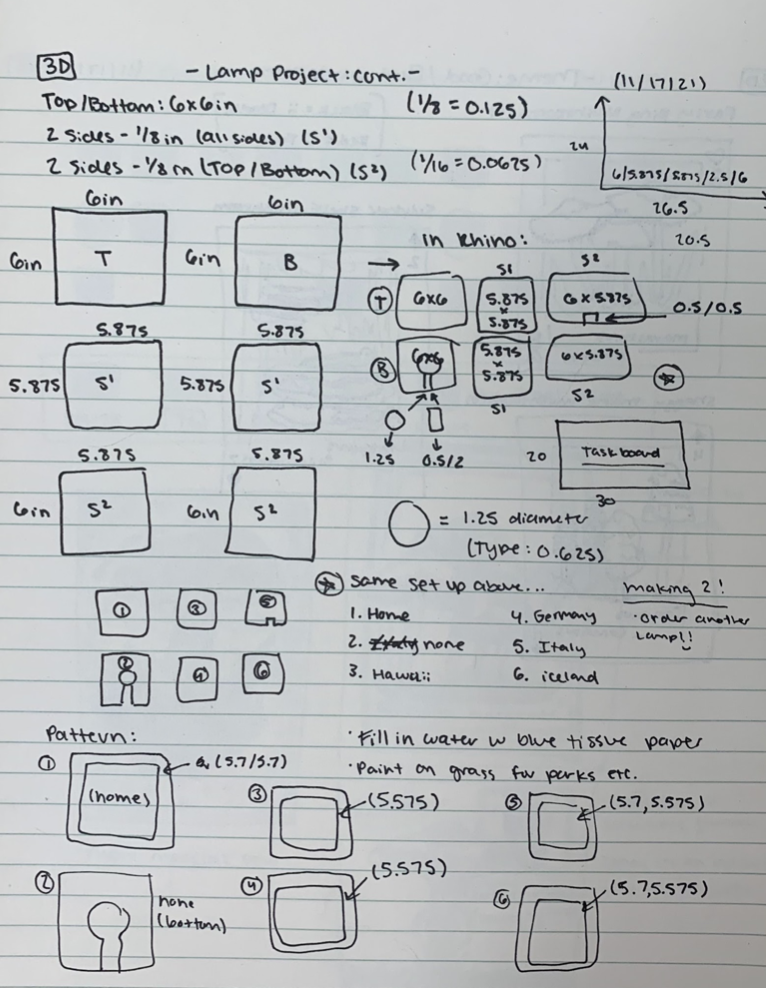
Before anything else, I immediately decided to start thinking about my design. I figured that once I had a better idea of what I wanted to do, learning about how to do it might be easier. After much thought, I decided to create a lamp design to show road maps of areas special to me. Before COVID, my family liked to travel a lot. I decided to go with a more personal design because I wanted to create something my whole family would appreciate since I planned to display it at our house. Each side of the cube is a road map of a different, meaningful place my family has experienced together.
Once I knew what I wanted my design to be, I was able to plan accordingly. I started by figuring out what applications I needed to download and what materials I needed for the lamp. When it came to programs, I decided I would do my inital outlines in Illustrator and then move that file into Rhino 3D so it could be formatted in a way the laser cutter could receive. Then I started thinking about what materials I wanted to make my lamp out of. I already knew the base would be made of task board, but it took me some time to decide on what papers to use to get the best “glow”. After a couple tests, I settled on white tissue paper and blue textured paper. Once took note of all my steps, I made sure I had the required materials and moved on to sketching.

SKETCHES
Before thinking about my design, I had to work on my measurements. For these, I found the most challenging part was taking into account the thickness of the task board. Since I wanted my lamp to be a perfect square, I had to subtract the thickness of the board on certain sides.
Although this step was very time consuming, it was very important I got the measurements right so I could create my design on the right sized pieces, as well as have them be able to fit together after being cut. But, once it was all measured, I was able to created my pieces in Illustrator and cut out the roads and water.

LASER CUTTING
Once I had my Illustrator file measured and finished, I transferred it into Rhino 3D since that is the file type the laser cutter is compatible with.
Then I sent the file to the laser cutter, things got easy. I made sure that it was the right file and that I loaded my task board correctly and pressed start. From there I just sat back and watched the laser cutter do its job.
Since my design was somewhat simple, it did not take long for my piece to finish.
MATERIALS
I decided to use brown/white tissue paper and blue texture paper to fill in the openings of the lamp. My goal was to create a very organic looking lamp with simple colors to really emphasize the busy design. Because of this, I decided not to paint my task board and leave the burnt edges of the lines visible to give it more of an earthy feel.
By having the blue be the only bright color, this lamp could be a nice addition to any room no matter the color schemes.

FINAL DESIGN

After adding the paper to the back of the panels, I glued all of the sides together and added my light.
As you can see, not only did my measurements come out great to make it a perfect square, but the blue also pops the way I had intended. I was very relieved to see that all of my roads and pieces stayed in place with the supports and that none of the areas were too thin and burned away.
Not only would this piece have looked great as a small sculpture, but it looks even better as a lamp at night.
REFLECTION
Throughout this process, I learned many new skills. This was my first time using any kind of laser cutter or even measuring things out in Illustrator. I really enjoyed this hands on work where I was able to watch my design come to life.
Although I did have one issue, I was able to catch it early enough before it was too late. On the bright side, this error was a lesson learned and I will now take extra steps during future projects to prevent mistakes such as this one.